
WordPress is the most popular and widely used content management system (CMS) that holds around 40% of all websites on the internet.
WordPress security is of utmost importance for every website owner.
Google blacklists around 50,000 websites for phishing on a weekly basis and 10,000+ sites for malware every day.
Also, according to patchstack, 43% of all cyberattacks are aimed towards small businesses. Only 14% of which are prepared for an attack, thus this justifies why they’re targeted.
So, if you are devoted to your website, the best practices for WordPress security should be an essential part of your business.
In this guide, we aim to provide you with the ultimate WordPress security tips in order to help you protect your website against malware and hackers.
While you may not be tech savvy, as a website owner there is a lot you can do to improve the security of your website.
Here are the key tips that will help you protect your WordPress site against any attacks.
Table of Contents
Why is website security so important?
If your WordPress website were to be hacked, it can cause a tremendous amount of damage to your revenue and reputation. Hackers can install malicious software, steal passwords and information, as well as distribute malware to your customers/users.
At a certain point, you may even have to pay ransomware to the hackers in order to get your website access back.
The hackers motive is obviously financial gain, thus if you have sensitive information as payment details, then securing your website is of utmost importance.
It’s very simple, if you have a physical store for instance you will most likely equipped it with an alarm system and cameras to protect the goods inside, having a website is the same and you must make sure you keep your WordPress site highly protected.
Keep WordPress updated
On a regular basis, WordPress is updated and maintained as it is an open source software.
WordPress automatically installs minor updates, however for major releases – you must manually install them.
The CMS is equipped with thousands of themes and plugins that you can install. They are cared for by third-party developers who frequently release updates.
All of these WordPress updates are of high importance for the stability and security of your website. Make sure that your theme, core and plugins are up to date at all times.
Strong Passwords
WordPress hacking attempts are frequently done through stolen passwords. Thus, it is highly recommended to use strong and unique passwords. This applies to your WordPress hosting account, FTP accounts, custom email addresses that use your site’s domain name, database and of course your WordPress admin area.
Also, in order to minimise any risk, it is best not to give anyone access to your WordPress admin account. If in your case you have guest authors or a large team, make sure to understand the user capabilities and roles in WordPress before giving permission and access to new user accounts and authors to your website.
WordPress security made easy (step-by-step)
If you are a beginner, securing your WordPress website might be frightening, especially if you are not tech savvy.
Here are some steps you can take to secure you website.
Install a WordPress Backup Plugin
First, you can begin with backups in order to avoid hacks to your WordPress website. They will help you to instantly restore your website in case of an attack.
There are several WordPress backup plugins, both free and paid, which you can install. However, you should remember to regularly save full-site backups to a remote location and not your hosting account.
For those of you who are not tech savvy you can use plugins like UpdraftPlus or BlogVault, as they are easy to use and do not need any coding.
An excellent WordPress Security Plugin
The next step is to setup a monitoring and auditing system which keeps track of everything going on your website. For instance, you can monitor failed login attempts, malware scanning, integrity monitoring and more.
A great WordPress Security Plugin is the Sucuri Scanner. It is free. All you need to do is download and activate the plugin.
Here you can see how to manage and install WordPress plugins.
During the activation process, you will have to go to the Sucuri menu in your WordPress admin. Firstly you will be asked to Generate a free API key. This sets up email alerts, integrity checking, audit logging and other significant features.
The next step you must take is to click on the “Hardening” tab located in the settings menu. Scroll through each option and click on the “Apply Hardening” button.
These settings will help by locking down the key areas that hackers use in their attacks. There is one hardening option which is a paid upgrade called Web Application Firewall, but skip this for now.
After the hardening portion, the default plugin settings usually do not need any changes as they are satisfactory.
The only recommendation which we have is to customize the “email alerts” as they may clutter your inbox. It is best to receive notifications for important actions like new use registration, changes made in plugins, etc. You can change the settings by going to Sucuri Settings » Alerts.
The Sucuri Scanner plugin is extremely powerful and effective, thus you can go through all of its setting and tabs to review everything it does such as Failed Login Attempt tracking, Malware scanning, etc.
Web Application Firewall (WAF)
A simple way to assure your site is safe and have assurance about your WordPress security is by using a web application firewall (WAF).
WAF bans all dangerous traffic before it is even able to reach your website.

Secure your WordPress site with SSL/HTTPS
SSL(Secure Sockets Layer) is a protocol which encrypts all data which is transferred between your website and users browser. By using this encryption it makes it difficult for a hacker to poke around and steal information.
When SSL is enabled, your website will use HTTPS instead of HTTP. Also, you will notice a padlock sign next to your website address in the browser.
SSL certificates used to be issued by certified authorities and thus cost anywhere from $80 and up per year. For this reason, many website owners who wanted to cut down on costs continued using the insecure protocol.
However, Let’s Encrypt (a non-profit organization) made the decision to offer free SSL Certificates to website owners. Their project is supported by many companies including, Facebook, Mozilla, Google Chrome, etc.
As mentioned, it is so easy to start using SSL for your WordPress website/s. A great deal of hosting companies offer a free SSL certificate for your website.
DIY Users and Wordpress Security
If you complete the steps above, then you should be good to go.
However, if you want to go further and make your WordPress security even stronger, then follow the next steps. Keep in mind though that they may need coding knowledge.
Default “admin” username
In the past, the default WordPress admin username used to be ‘admin’. Due to the fact that the username makes up 50% of the login credentials, this allowed hackers to easily perform attacks.
In present days, WordPress fixed this and you are currently required to select a custom username when installing WordPress.
Nonetheless, there still exists WordPress 1-click installers who set the default admin username to ‘admin’. If you experience this, the best thing to do is switch your web hosting.
Yet, it’s important to remember that WordPress does not allow you to change usernames by default, thus there are 3 procedures you will need to perform in order to change the username.
- Create a new admin username and delete the previous one.
- Use the Username Change Plugin
- Update username from phpMyAdmin.
Disable File Editing
WordPress has a built-in code editor that grants you with the opportunity to edit your plugin files and theme within your WordPress admin space. However, if the wrong individuals get their hands on these features, it means that there is a security risk, thus it is better to turn it off.
You can accomplish this by adding this code in your wp-configure.php file:
//Disallow file edit
define( 'DISALLOW_FILE_EDIT' , true );
Another way to do this is with 1-click by using the Hardening feature in the Sucuri plugin.
Disable PHP File Execution in Specific Directories
An additional way to make your WordPress Security solid is by disabling PHP file execution in directories where it’s unnecessary like /wp-content/uploads/.
In order to complete this step, open a text editor such as Wordpad/Notepad and paste the following code:
<Files *.php>
deny from all
</Files>
Afterwards, you must save the file as .htaccess and upload it to /wp-content/uploads/ folders on your website by using an FTP (“File Transfer Protocol”) client.
Note: The above is valid only if you are using Apache web server. These settings have no effect on nginx server.
Hinder Login Attempts
Adding Two Factor Authentication
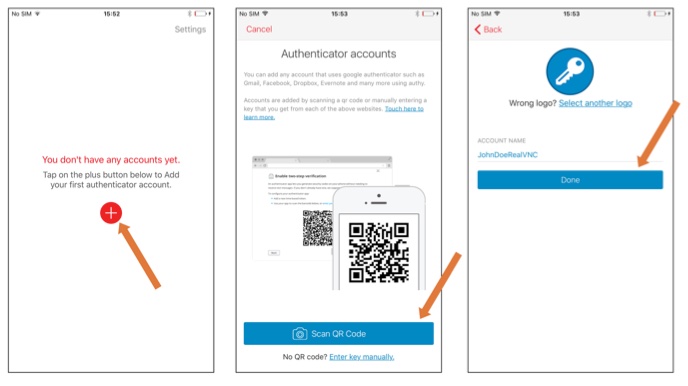
You’re done. The authentication app will save this and the next time you login to your website, you will be asked for a two-factor authentication code once you have entered your password.
On your mobile device, open the authenticator app and enter the code you see.
Modify WordPress Database Prefix
For all tables in your Wordpress database, WordPress uses wp_ as a prefix. This is a default setting and if your WordPress site is using it, this makes it very easy for hackers to figure out what your table name is. Thus, it is best to change it.
In order to change your database prefix, follow this step by step tutorial.
How to Protect your WordPress Admin and Login Page
Usually, a hacker can ask for your wp-admin folder and be able to login without any restraint. This gives them the ability to try and to hack or run DDoS attacks.
An additional password protection can be included on a server-side level, hence such requests will be blocked.
Here are some tips on how to protect your WordPress login page.
Disable Directory Browsing and Indexing
Hackers can use directory browsing in order to learn whether you have any files that have exposure and vulnerabilities. Thus, they can use this to their benefit and gain access to these files.
On the other hand, directory browsing can also be used by other individuals to look into your copy images, files, discover the structure of your directory and other details. For this reason, we urge you to turn off directory browsing and indexing.
What you have to do is connect to your website by using cPanel or FTP’s file manager. Afterwards, find the .htaccess file located in your website’s root directory. If in any case you do not see it there, then click here.
Finally, at the end of the .htaccess file insert the following line:
Options -Indexes
Remember to save and upload .htaccess file back to your website.
Note: The above is valid only if you are using Apache web server. These settings have no effect on nginx server.
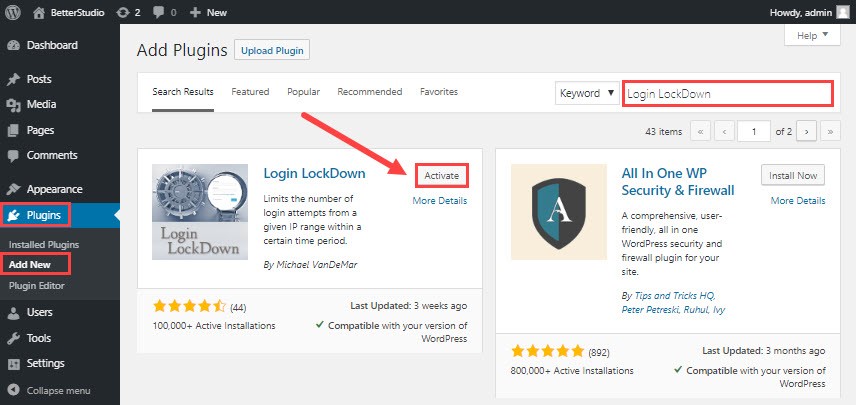
Disable XML-RPC in WordPress
In WordPress 3.5 XML-RPC was implemented by default in order to aid the connection of your WordPress site with mobile and web apps.
Due to how powerful it is, XML-RPC can undoubtedly increase the brute-force attacks.
For instance, if a hacker decided to try 300 different passwords on your website, they would have to try 300 different login attempts which the login lockdown plugin will catch and block them.
However, with XML-RPC a hacker may use the system.multicall function in order to try as many passwords as he wishes with only 20 or 50 requests for instance.
For this reason, if you are not currently using XML-RPC, it is best to disable it.
You can use a plugin for that – Secured WP has an option to disable that with one click.
Here are 3 ways to disable XML-RPC in WordPress:
In order to disable XML-RPC in WordPress 3.5, all you need to do is paste the code below in a site-specific plugin:
add_filter( 'xmlrpc-enabled' , '_return_false' );Another way is to install the following plugin “Disable XML-RPC”. After installation activate it. It will do the same job as the code above.
The solution which we mentioned above is preferred by many, however it can take up a lot of resources for websites that are being attacked.
So, in order to disable WordPress XML-RPC with .htaccess, please follow these instructions. Here we will disable all xmlrpc.php requests from the .htaccess file before the requests is sent to WordPress.
Use this code in your .htaccess file:
# Block WordPress xmlrps.php requests
<Files xmlrps.php>
order deny,allow
deny from all
allow from 123.123.123.123
</Files >
To sum up, the .htaccess approach is the preferable one due to the fact that it’s the least resource intensive.
If you’ve decided to use the web-application firewall we discussed earlier, then all of this will be managed by the firewall.
Note: The above is valid only if you are using Apache web server. These settings have no effect on nginx server.
How to log out Idle Users in WordPress
There are times when logged in users step away from their screens and this creates a security threat. Someone might seize control of their session, make changes to their account or change passwords.
For this reason, financial and banking sites automatically log out any inactive users. The same can be enabled for your WordPress website.
In order to do this, you will need to install and then active the Inactive Logout plugin. Once you have activated the plugin, visit Settings » Inactive Logout page in order to configure plugin settings.
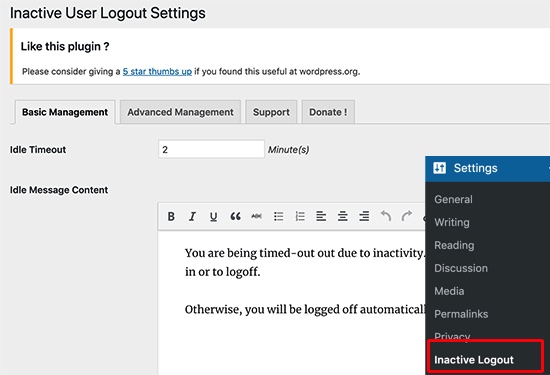
All you have to do is set the time duration and add a logout message. Afterwards, save the changes you have made in order to store your settings.
Include Security Question to WordPress Login Page
Examine WordPress for Vulnerabilities and Malware
If you have installed a WordPress security plugin, it will frequently check for malware and any indications of security breaches.
Nonetheless, if you notice a drop in your website traffic or search rankings, then it’s best to manually examine your website. You can do so by using your WordPress Security plugin, or by using security and malware scanners.
It is pretty simple to run an online scan. All you have to do is enter your website URL and their crawlers will go through your site in search of any malicious code and malware.
However, remember that most WordPress security scanners are able to scan your website. They are not able to get rid of malware or clean a hacked site.
So, let’s dive deeper into how you can clean up malware and a hacked WordPress website.
How to fix a hacked WordPress Site
Most of WordPress’s users don’t understand the significance of website security and backups. Only when it is too late and their website is hacked, they begin to search for improvements.
To clean up a WordPress website can be problematic and slow. It’s best to hire a professional who can take care of this for you.
It is known for hackers to install backdoors on sites which are affected, and if the backdoors are not taken care of accordingly, your website may be hacked again.
In order to make sure that your website is protected against any future attacks, you can hire a professional security company, for instance Sucuri.
Overall, you can see how crucial it is to make sure your WordPress website is protected against attacks. We hope that this guide has helped you secure your site by using the best plugins WordPress can offer.
Originally posted 2021-08-01 16:34:32.